- Home
- Gluten Free Cooking
- Meat Cooking
Gluten-Free Meat Cooking: Choose the Right Cut & Cook to Perfection
When I first stepped into my kitchen after my celiac diagnosis, I felt a bit lost. We’re meat lovers in our house, but I didn’t know what I could eat safely.


I learned quickly that fresh, unseasoned cuts of meat are naturally gluten-free. Gluten comes from what we add. Like many people, we relied on bottled sauces, packaged marinades, seasoning mixes and coatings for flavor, and many of these contain gluten.
The confidence that I could make this work came from learning what I’m about to share with you. Delicious meat dishes don’t come from a bottle; they come from understanding how to cook meat properly using simple, gluten-free ingredients.
In this guide, I’ll show you how to choose the right cut, use the best cooking method, and avoid the common places gluten can sneak in.
On this page:
What Makes a Meat Dish Gluten-Free (or Not)
How to Cook Delicious Meat Dishes Without Gluten – 4 Simple Techniques
What Makes a Meat Dish Gluten-Free (or Not)
Whole, fresh cuts of meat are naturally gluten-free. Gluten comes from what we add to the meat and the environment where it’s processed or cooked.
 |
Want simple guidance, trusted resources, and doable recipes delivered to your inbox once a week? |
|
Watching for Added Gluten
Here are the most common ways gluten gets added to meat dishes:
- Processed meats like sausage and cold cuts may contain fillers or additives.
- Sauces and marinades often include soy sauce, Worcestershire sauce, or malt vinegar.
- Seasoning blends may contain flour or anti-caking agents.
- Coatings and breading usually contain gluten.
- Broths and stocks may include wheat or barley.
This means you’ll need to check labels, avoid products with gluten, and look for simple substitutes for your recipes.
Cross-Contamination

Cross-contamination or cross-contact happens when gluten touches gluten-free food and it’s no longer safe for someone with celiac disease. Here’s how that can happen:
During Processing
If equipment isn’t properly cleaned between batches, gluten can be introduced. Ask your butcher about their practices when making sausages, for example.
During Cooking
We can accidentally contaminate our own food, especially if gluten and gluten-free foods are cooked together.
- Make sure your grill is clean (use a grill mat or foil.)
- Don’t share utensils between gluten and gluten-free dishes.
- Make sure cutting boards and strainers are clean or keep separate ones for gluten-free food.
- If you’re cooking gluten and gluten-free foods in the oven at the same time, keep the gluten-free item on top and covered if possible.
If you want to learn more about choosing gluten-free meats, Is Meat Gluten-Free? A Complete Guide to Safe & Unsafe Choices is a good place to start.
How to Cook Delicious Meat Dishes Without Gluten – 4 Simple Techniques
I’m about to transform your cooking! Yes, it’s that dramatic.
These four techniques gave me more confidence in the kitchen than anything else I learned. They apply to all cooking, but they’re especially helpful for gluten-free meals because they reduce the need for packaged sauces and mixes where gluten often shows up.
The four principles:
- Match the cut to the cooking method
- Use simple, homemade gluten-free sauces, seasonings and marinades.
- Control heat and moisture
- Cook to the correct doneness
1. Match the Cut to the Cooking Method

Tender cuts of meat are best cooked quickly with dry heat. Think grilling, pan frying, roasting, or stir-frying.
These cooking methods use medium-high heat and a little oil to create a lightly browned crust while the inside stays tender and moist. Examples of tender cuts of meat include chicken breast, sirloin steak, pork tenderloin, fish or lamb chops.
Tougher cuts of meat benefit from time and liquid. Now we’re talking about braising, stewing and simmering.
Learning to cook tougher cuts of meat will add variety to your meals and help with the budget. They are often less expensive and contain more connective tissue, which breaks down during cooking to create rich flavor and a silky texture. Examples include beef chuck, pork shoulder, and lamb shoulder. Chicken legs and thighs fit here too, although they can also be grilled or roasted.
2. Use Gluten-Free Sauces, Seasonings and Marinades
Remember all those bottles and packages we talked about? You don’t need them. All you need are a few simple pantry items and a little know-how.
Pan Sauces
When you pan fry a pork chop, chicken breast or fish filet, notice the lovely brown bits stuck to the bottom of the pan. That is pure flavor. Add a little wine, gluten-free broth, or water to loosen them (this is called de-glazing). A splash of lemon juice or apple cider vinegar brightens the flavor. You can let it simmer and reduce to thicken or stir in a little cornstarch and water.
Voilà – an easy, delicious, gluten-free sauce.
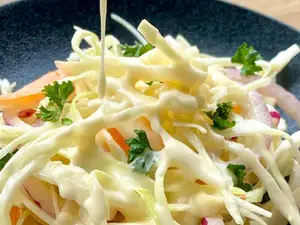
Simple Marinades
Marinades do two things – they add flavor and tenderize meat. For that, you need an acid, oil and flavoring. Sound like salad dressing? In fact, homemade salad dressings make great meat marinades.
Steak Marinade – ¼ tsp of kosher salt, ½ tsp of black pepper, 1/3 cup of gluten-free soy sauce, 1/3 cup balsamic vinegar, ½ cup of olive oil, ¼ cup of gluten-free Worcestershire sauce, 2 cloves of minced garlic, 2 tender steaks like sirloin or ribeye.
Chicken Marinade – ¼ tsp kosher salt, ¼ tsp of black pepper, 1 tsp of Dijon mustard, 1/3 cup of lemon juice, ½ cup of olive oil, 1 clove of minced garlic, 4 chicken breasts.
Place your marinade in a container or a Ziploc bag. Add the meat. Let it sit in the fridge for 1 to 4 hours.
Gluten-Free Coatings

Chicken parm, breaded shrimp, and pork schnitzel are favorites that we celiacs often miss out on for one obvious reason: the breading.
There are several gluten-free alternatives to breadcrumbs, and once you’ve tried a couple you may like them better than the gluteny versions.
3. Control Heat and Moisture
Browning adds deep satisfying flavor to meat, and moisture is the enemy of browning. To brown meat you need:
- A dry surface – Pat your meat dry with paper towel.
- Room in the pan – An overcrowded pan creates moisture, and your meat will steam instead of browning. Cook in batches if necessary.
- Medium-high heat and a little oil
Tougher cuts of meat can be browned to add flavor, then simmered on low heat in liquid (broth, wine, juice, water, or a combination) for at least an hour to tenderize. This combination of dry and moist heat cooking is called braising.
4. Cook to the Right Doneness

Doneness is measured in two ways:
- For tender cuts: temperature.
- For tougher cuts: tenderness.
To check the temperature of your meat, use an instant-read meat thermometer.
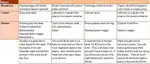
Doneness Chart
|
Rare Medium Well Done |
– 52°C to 54°C or 125°F to 130°F – 60°C to 66°C or 140°F to 150°F – 71°C to 82°C or 160°F to 180°F |
Chicken and ground meat should always be well done.
Pork and lamb can be medium-well to well done.
Beef can be cooked to preference.
To test fish, insert a fork and twist. It should flake apart.
Doneness Chart
Rare
52°C to 54°C
125°F to 130°F
Medium
60°C to 66°C
140°F to 150°F
Well Done
71°C to 82°C
160°F to 180°F
Chicken and ground meat should always be well done.
Pork and lamb can be medium-well to well done.
Beef can be cooked to preference.
To test fish, insert a fork and twist. It should flake apart.
Resting Your Meat
Tender cuts should always be rested after they come off the heat and before cutting.
This allows the juices to redistribute through the meat, so they won’t run out onto your cutting board.
- Small pieces of meat need 5 to 10 minutes
- Roasts should be rested for 15 to 30 minutes.
Apply It: Cooking Different Types of Meat
Now that we’ve been through the core principles, let’s apply what we’ve learned. Are you ready to get cooking?
How to Cook Beef
Tender Cuts – Steaks and Roasts
Sirloin roasts, T-bone steak or ribeye steaks – these are tender cuts so cook them quickly at high heat.
Your steak will do nicely on the grill. You can marinade it if you like or season it simply with salt and pepper. Pat it dry on both sides with paper towel, brush with a little oil and season. Grill for 4-7 minutes on each side for medium-rare. Check the temperature and let it rest for 5 minutes.
Ready to put these skills into practice?
Pan-frying a steak is one of the easiest ways to apply these techniques. Learn how to get a perfect crust and cook your steak exactly the way you like it.

Your roast will go in the oven on medium high heat (375°F) for 15 to 20 minutes per pound. Add some fat to the pan so it won’t burn. Leave the lid off. Check the temperature after an hour. Let it rest for 15 to 30 minutes before slicing.
Tougher Cuts – Stews and Pot Roasts
 Gluten-Free Beef Pot Roast
Tougher cuts of meat need time and liquid. They are done when they are tender; it’s not about temperature.
Season your meat with salt and pepper and brown it in a little oil. Remove the meat and brown up some onion, garlic and whatever else you are adding for flavor. Return the meat to the pan, cover about 2/3 with liquid, put the lid on and simmer on low until tender.
- Stews will take about 1 to 1 ½ hours.
- A pot roast will be closer to 3 hours. Stick a fork in to see if it’s tender
Here are a few beef recipes that put these techniques into practice:
Gourmet Gluten Free Beef Stew with Red Wine and Chocolate — a classic braise where a tougher cut becomes rich and tender over time.
Hardy and Rich Gluten Free Beef Hotpot with Chocolate and Cider — slow-cooked comfort food that builds deep flavor with simple ingredients.
Gluten Free Meatloaf Recipe: The Ultimate Weeknight Comfort Food — a practical ground beef dish using gluten-free binders instead of breadcrumbs.
How to Cook Chicken

Chicken breasts are tender and lean. They can be grilled, pan fried or baked. The most important thing is to get the correct level of doneness. Undercook chicken and you risk food poisoning. Overcook and your chicken breast will be dry and tough.
My favorite way to cook a chicken breast is in the oven. It’s a little gentler than the grill or pan. I recommend marinating or brining chicken breasts to add moisture and flavor.
Pat your chicken breasts dry with paper towel and place them on a parchment lined baking sheet. Season with salt, pepper, garlic powder and a little smoked paprika. Place them in a 375°F oven and bake for 20 to 30 minutes. Check the temperature and let it rest for 5 to 10 minutes.
Chicken thighs and legs are a little fattier and this makes them more forgiving. You can bake these as well or cook them slowly in the crockpot. Toss some chicken thighs in the crockpot, add liquid and flavor, then walk away. When you come back a few hours later, dinner is ready.
Here is a simple idea:
- Season 2 pounds of chicken thighs with salt & pepper and place them in the crockpot.
- Add a diced onion, ¼ teaspoon of crushed chillis, 1 minced garlic clove and a can of crushed pineapple.
- Cook on low for 5-6 hours or on high for 2½-3 hours.
Here are a few chicken recipes that put these techniques into practice:
Gluten Free Chicken Parm: Crispy, Delicious and Easy to Make — a great example of using gluten-free coatings for a crispy finish.
Slow Cooker Chicken Basque: A World of Taste in One Gluten Free Dish — shows how moist heat cooking creates tender, flavorful chicken with minimal effort.
Superb Garam Masala Chicken Curry That's Gluten Free and Dairy Free — a simple way to build bold flavor without relying on packaged sauces.
How to Cook Pork

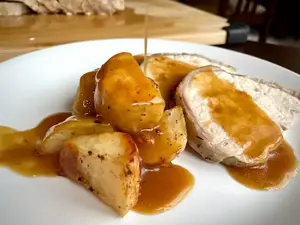
Tender Cuts – Loin Chops, Loin Roast, Tenderloin
Pork Chops are steaks, and you cook them the same way. Season with salt, pepper and a little garlic powder. Brush with oil. Grill for about 7 minutes per side. Test for doneness with an instant read thermometer and rest for 5 minutes. Don’t overcook your chops or they will be dry and tough.
Pork Loin Roast is a beautiful yet often overlooked piece of meat. Season it with salt and pepper, then poke it all over with a knife and insert slices of garlic into the slits. Slide whole sprigs of rosemary under the strings, then roast it in a 375°F oven for 20-25 minutes per pound. Let your roast rest for 15-20 minutes before slicing, then serve with my curry pineapple chutney.
Tougher Cuts - Shoulder and Ribs
Imagine a sticky, sweet pulled pork sandwich with barbecue sauce dripping down your chin. Or how about finger lickin’ fall-off-the-bone ribs? These are full of tough connective tissue and that’s why they are so flavorful. But they need time.
Pulled pork comes from a pork shoulder roast and the easiest way to cook it is in the crockpot. Mix 1 tablespoon of chili powder, 1 tablespoon of kosher salt, ½ teaspoon of ground cumin and ¼ teaspoon of cinnamon and rub it all over your roast. Place it in the crockpot with 2 sliced onions, 4 cloves of garlic and a cup of gluten-free chicken broth. Cook until fork tender – 5 hours on high or 8 hours on low. Pull the meat apart with a fork and add 2 cups of gluten-free barbecue sauce.
Ribs start out in the crockpot too with the same recipe as the pulled pork. Rub with the spice blend and place in the crockpot with onion, garlic and chicken broth. Cook 4-6 hours on low, lay them out on a foil lined baking sheet, slather with gluten-free barbecue sauce and caramelize the sauce on the grill or under the broiler in your oven. Watch closely, they will burn easily.
Here are a few pork recipes that put these techniques into practice:
Gluten Free Pork Tenderloin Recipe with Maple Glaze — a quick-cooking tender cut finished with a simple homemade glaze.
Simple Sweet and Sour Pork Recipe: Tasty, Tangy and Gluten Free — uses a homemade sauce instead of bottled versions that often contain gluten.
Gluten Free Beer Braised Sausage & Rich Onion Gravy — a good example of building flavor with braising and a gluten-free gravy.
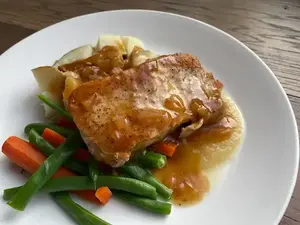
How to Cook Fish
 Baked Basa Filets with Lemon Wedges
Fish cooks quickly and dries out easily, so remember not to overcook it.
My two favorite methods are oven baking and pan frying. You can grill fish, especially salmon, but it’s a pain if it falls through the grill.
To pan fry fish – season it on both sides with salt, pepper, garlic powder and dried dill. Melt butter in your pan on medium high heat and place your fish flesh side down. Cook 4-5 minutes per side depending on thickness. Watch the side of your filet and you’ll see it cook. Once it’s cooked about halfway up, flip it over. To test for doneness insert a fork and twist. The fish will flake apart.
To oven-bake fish – season your fish the same as the pan fry method. Place your filets skin side down on a parchment lined baking sheet (you can put lemon slices underneath if you like) and brush with melted butter. Bake at 400°F for 12-15 minutes. Test for doneness with a fork.
Here are two fish recipes that put these techniques into practice:
Almond and Pecan Crusted Gluten Free Baked Haddock — demonstrates a gluten-free alternative to traditional breading.
Easy Gluten Free Coconut Shrimp: A Tropical Treat in Under 30 Minutes — a crispy coating using naturally gluten-free ingredients.
Common Mistakes (Quick Fixes)
There are a few common pitfalls when it comes to cooking meat. Here are some troubleshooting tips to help.
Why is my meat dry?
Why is my meat dry?
It’s probably overcooked. Use an instant read thermometer to test for doneness. To save dried out meat, add it to a soup or sauce and let it sit in the fridge overnight. It will soak up some moisture.
Why won’t my meat brown?
Why won’t my meat brown?
The surface may be damp, or your pan may be overcrowded. Pat the surface dry with paper towel and cook in batches if necessary. Try brushing with oil, that will help with browning.
Why is my meat tough?
Why is my meat tough?
Tender cuts of meat will turn tough if overcooked. Tougher cuts of meat just need more cooking time.
Why should I rest my meat after cooking?
Why should I rest my meat after cooking?
Resting tender cuts of meat allows juices to redistribute into the meat. This creates a juicier and more tender piece of meat.
Recommended Tools and Products
Preparing meat at home? Here are some tools and gluten-free finds that make cooking safer, easier, and more delicious — all available on Amazon.
As an Amazon Associate I may make a small commission at no cost to you, if you decide to buy something.
Instant-Read Meat Thermometer
Safely cook meat to the perfect temperature without overdoing it. I own and love this digital thermometer. It is a must-have in any kitchen.
ThermoPro Digital Instant Read Meat Thermometer
Intelligent Indoor Grill
I own and love this grill! So much so that I bought one for each of my adult kids. It cooks your meat to perfection, even from frozen.
T-Fal OptiGrill Stainless Steel XL Electric Grill
Other Important Tools
Cooking Meat with Confidence, Not Gluten
 Pork Cottage Roll with Herbs
Do you feel better about cooking gluten-free meat dishes? You don’t need a pantry full of sauces or special recipes for every cut. You just need to understand these four key principles, and you can cook any cut of meat.
Most importantly – relax. It’s just dinner. If it doesn’t turn out perfectly the first time, you’ll have plenty of chances to practice.
|
|
Want simple guidance, trusted resources, and doable recipes delivered to your inbox once a week? |
|

Patty Maguire is a George Brown College culinary graduate whose training focused on nutrition and cooking for special diets.
Since her celiac diagnosis in 2012, she has shared a practical, whole-food approach to naturally gluten-free living that helps readers cook with confidence, eat out safely, travel well, and live fully.
Rooted in farm-family values and simple home cooking, her work has been recognised by Feedspot’s top 10 Canadian gluten-free blogs list.
You might like these
Gluten-Free Salad Dressing: Easy Formula + 5 Simple Recipes
Learn a simple formula for gluten-free salad dressing plus easy recipes you can make in minutes. No bottles needed—just fresh, safe ingredients.
Gluten Free Meal Planning
meal planning and shopping list for a typical gluten free week
Perfect Poached Eggs
Protein is an essential part of a gluten free breakfast and these perfect poached eggs can be the quick easy centerpiece


Hi, I'm Patty.
I'm a person with celiac disease, a culinary school grad, and a lifelong student of food and natural healing.
After my diagnosis in 2012, I enrolled in the Chef’s School at George Brown College and earned my Culinary Skills diploma, focusing on nutrition and cooking for special diets.
Cooking has changed my life — and helped me take back my health. Now, I’m here to help you do the same.
Let’s do this together!

Subscribe!
Get Naturally Gluten-Free Digest
Practical gluten-free tips + a featured recipe/article
delivered to your inbox.
Recent Articles
-
How to Make Gluten-Free Gravy That’s Rich, Smooth, and Satisfying
May 20, 26 01:09 PM
 Learn how to make gluten-free gravy that is rich, smooth, and full of flavor. Foolproof recipe with or without drippings, plus cornstarch and make-ahead tips.
 -
How to Make a Pan Sauce (Easy Restaurant-Quality Sauce in 5 Minutes)
May 13, 26 04:46 PM
Learn how to make pan sauce in 5 minutes and turn the browned bits in your skillet into a gluten-free sauce that makes chicken, steak, or pork taste special. -
How to Pan Fry a Steak (Pan-Seared Method for a Perfect Crust)
May 02, 26 09:07 PM
 How to pan fry a steak perfectly on the stove. Get a golden crust and juicy center with this simple step-by-step method, timing guide, and expert tips.
Popular Articles


Trained in Culinary Skills with a focus on Nutrition and Healthy Eating!

Visit NGF (NaturallyGluten-Free) on Facebook at: https://www.facebook.com/naturallyglutenfree
On Substack at: Naturally Gluten-Free Digest
Patricia Maguire, copyright © 2026 naturallygluten-free.com Port Hope, Ontario, Canada. All rights reserved
Subscribe to
Naturally Gluten-Free Digest
- Feel safer and more confident eating gluten-free
- Save time and money with practical strategies
- Discover trustworthy recipes and resources without wading through misinformation
It's Free!
You won't have to remember to check back.
NGF will land in your inbox weekly.
and
As a thank-you from me you get a free
Printable Gluten-Free Food List
that you can pin to your fridge or take shopping.
I respect your privacy!
I won't use your email for anything but to send you the newsletter.