- Home
- Gluten Free Cooking
- Meat Cooking
- How to Roast a Chicken
How to Roast a Chicken That’s Juicy, Crispy, and Simple
Roast chicken is one of my favorite naturally gluten-free meals because it feels comforting and familiar. It’s one of those reliable meals that helps food feel normal again — especially if you’re newly gluten-free. And it’s surprisingly simple once you know the basics.
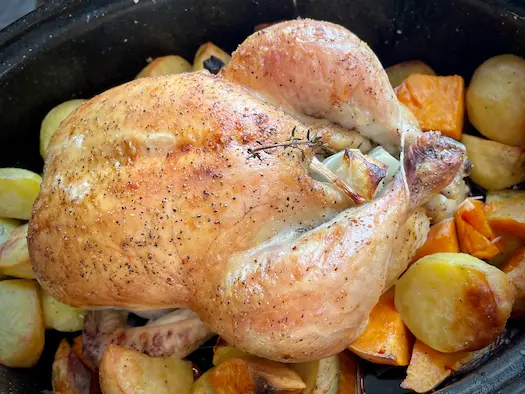
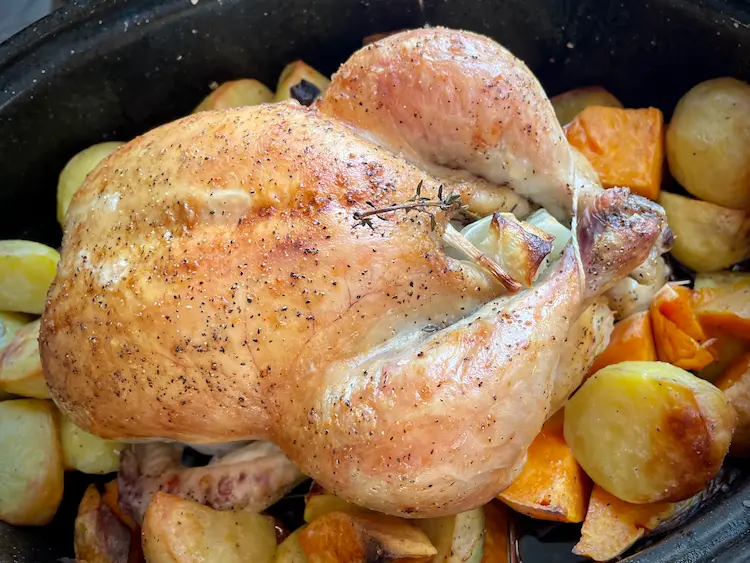
The method I’m about to show you is simple enough for everyday family cooking, yet the result is impressive enough to serve to guests. A roasted chicken surrounded by vegetables and served with gravy sounds and looks complicated — but it’s really an easy, one-pan meal that is filling, affordable, and flexible enough to turn into several easy meals through the week.
On This Page:
- The Best Way to Make a Roast Chicken
- Why Roast Chicken Is Worth Learning
- Before You Start
- Should Chicken Be Room Temperature?
- Tools You Need
- Ingredients for Roast Chicken
- Step-by-Step: How to Roast a Chicken (The Recipe)
- Should You Truss Your Chicken?
- Best Temperature for Roast Chicken
- Roast Chicken Time Chart
- How to Tell When Roast Chicken Is Done
- How to Carve a Roast Chicken
- How to Get Crispy Skin
- How to Fix Common Roast Chicken Problems
- What to Serve with Roast Chicken
- Leftovers, Broth, and Meal Ideas
- FAQs
 |
Want simple guidance, trusted resources, and doable recipes delivered to your inbox once a week? |
|
The Best Way to Make a Roast Chicken
The best way to roast a chicken is the simplest way — a moderate oven, simple seasonings, and a little oil to crisp up the skin.
If you search the internet, you’ll find variations involving complicated rubs or switching the oven temperature part way through. That’s fine if you like to experiment – which I encourage – but here we’re going with a reliable, repeatable technique that you’ll soon be so comfortable with that you won’t even need a recipe.
The Simplest Roast Chicken Method
Pat chicken dry, inside and out. Season generously with salt and pepper and brush with oil. Roast at 375°F (190°C) until the breast reaches 160°F. Rest 15 minutes, then check that the final temperature reaches the USDA recommended 165°F (74°C) before carving.
Why Roast Chicken Is Worth Learning
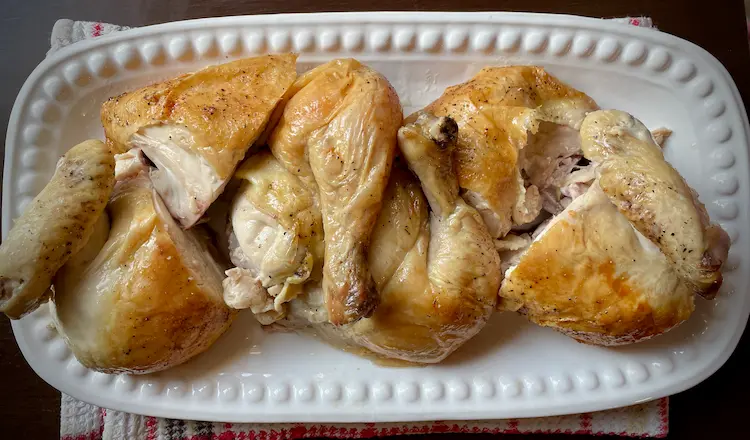
When you think of “cooking from scratch” you might envision hours spent chopping and sautéing to put a meal on the table. But it doesn’t have to be like that. Roast chicken is a prime example of how we can make simple, satisfying meals from whole foods and a few ingredients you likely already have in your pantry.
If, like me, you’re trying to get away from packaged foods and bottled sauces, roast chicken is a good starting point. There are no complicated ingredient labels to decode and no specialty products to buy. Just a chicken, a few basic seasonings, and a cooking method you can use over and over.
And it’s economical too. With rising grocery prices, chicken is still relatively inexpensive, and the leftovers can become sandwiches, soups, salads or even tacos.
Before You Start
Before we get into the cooking part, here is some set-up info to get you started.
Choose the Right Chicken
If you’re standing in the supermarket or at the butcher’s counter wondering which chicken to buy, my best advice is – don’t overthink it. Buy a chicken.
What Size to Buy
The general rule of thumb is 1 pound (including meat, skin and bones) per person. So, a 4-to-5-pound chicken will serve 4 people, or 2 people with leftovers.
Fresh or Frozen
If you’re cooking your chicken tonight, fresh is best. If it’s going to be a day or two, then either is fine. If you’re planning to store your chicken in the freezer for later, make sure you’re able to get it home quickly and right into the freezer. I like to bring a cooler with me if there’s any chance I’ll be delayed getting home.
Thawing Chicken
Never thaw your chicken on the counter at room temperature. You risk food poisoning from bacteria that grows easily at temperatures between 40°F-140°F (4°C - 60°C)1
To thaw a frozen chicken, place it in the refrigerator the day before you plan to cook it. If you need to speed things up a little, place the chicken in a large bowl of cold water in the refrigerator. I often do this and find it helps the chicken thaw more quickly while staying safely chilled.
Should Chicken Be Room Temperature?
Conventional wisdom is that you should take your meat out of the refrigerator 30 to 60 minutes before cooking. This will help it to brown better.
With chicken, I lean toward “better safe than sorry”. I’ve had food poisoning and it’s not an experience I care to repeat. According to the USDA, an hour at room temperature is likely fine, but I take my chicken out just a few minutes ahead of time. If you dry it thoroughly and brush it with a little oil, it will brown up nicely.
Tools You Need
- A roasting pan. You can also use an oven-proof skillet or a baking dish.
- An instant-read thermometer.
- Optional rack – for the bottom of your pan.
- Optional kitchen twine – if you’re going to truss your chicken – more on this later.
I've provided a few links for your convenience. If you choose to purchase through one of these links I may earn a small commission at no extra cost to you.
Ingredients for Roast Chicken
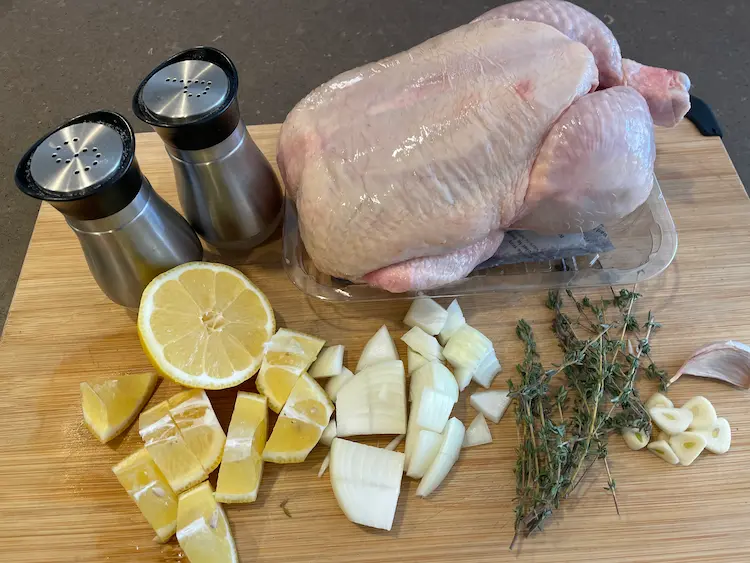
- whole chicken,
- oil/butter,
- salt & pepper,
- optional aromatics – to stuff your chicken
- optional vegetables – to roast alongside your chicken
Optional Flavor Variations
If you want the absolute simplest roast chicken, season inside and out, with salt and pepper. If you want a little extra flavor and color, try these simple variations:
- Stuff the chicken with sliced lemon, onion, garlic and fresh thyme or rosemary
- In addition to salt & pepper, sprinkle a little paprika or garlic powder on the outside.
- Instead of brushing with oil or melted butter, add lemon zest and dried herbs to 2 tablespoons of butter then smear it all over the chicken.
Step-by-Step: How to Roast a Chicken

How to Roast a Chicken That’s Juicy, Crispy, and Simple
By Patty Maguire – Naturally Gluten Free,
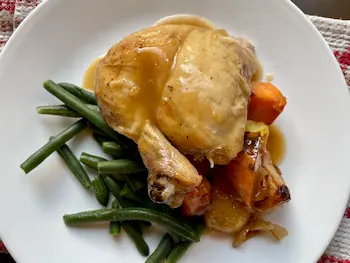
This simple roast chicken recipe produces juicy meat, crispy skin, and flavorful drippings for homemade gravy. It’s an easy one-pan meal that can feed your family for dinner and provide leftovers for sandwiches, soups, salads, and more.
Prep Time: 20 minutes
Cook Time: 1 hour 20 minutes to 1 hour 40 minutes
Yield: 4 servings plus leftovers
Tags: Gluten Free
Ingredients
- 1 whole chicken (4 to 5 pounds)
- 2 tablespoons olive oil or melted butter
- Salt and pepper to taste
- Optional: ½ lemon, diced
- Optional: 1 small onion, diced
- Optional: 2 cloves garlic, sliced
- Optional: 3 to 4 sprigs fresh thyme or rosemary
- Optional: potatoes, carrots, and onions cut into large chunks for roasting alongside the chicken
Instructions
- Preheat your oven to 375°F (190°C).
- Pat the chicken dry inside and out with paper towels.
- Season generously with salt and pepper inside and out.
- If desired, stuff the cavity with lemon, onion, garlic, and fresh herbs.
- Place the chicken on a rack in a roasting pan or directly in the pan. Brush the skin with oil or melted butter.
- If using vegetables, arrange them around the chicken and toss them lightly with oil, salt, and pepper.
- Roast uncovered for approximately 15 to 20 minutes per pound.
- Begin checking the temperature at the lower end of the cooking range. Insert an instant-read thermometer into the thickest part of the breast and thigh without touching bone.
- Remove the chicken from the oven when it reaches 160°F (71°C). The temperature will continue to rise to the recommended 165°F (74°C) while resting.
- Rest the chicken for 10 to 15 minutes before carving and serving.
Should You Truss Your Chicken?
There are benefits to trussing a chicken, and I’ll show you how below. But if you don’t want to, that’s fine – it’s your chicken. My mom never trussed her roast chickens and I promise, the chicken police never once showed up at our door. I’ve roasted chickens successfully trussed and un-trussed.
What are The Benefits of Trussing a Chicken
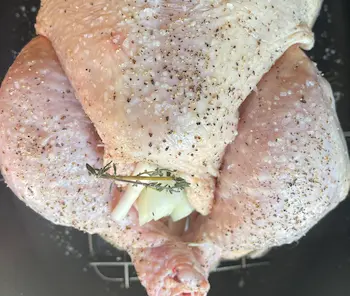
The one you’ll hear most often is “it cooks more evenly.” Honestly, I’ve never found it makes much difference, but if you are having trouble with uneven cooking, you might try trussing. Tucking the wings in behind will keep them from burning.
It keeps the bird moist. The idea is that an unstuffed, untrussed bird will allow heat to circulate inside the cavity, drying out the breast meat. Again, I’ve never found it to be an issue.
It keeps the stuffing inside. This one is true, but how much does it matter? It’s easier for moving the chicken from the pan to the cutting board, but if you choose not to do it, that’s fine.
It makes the bird easier to handle. True, but how much do you need to handle it? It might fall apart when you move it from the pan to the cutting board for resting and carving. If that worries you, consider trussing your chicken.
How to Truss a Chicken
 |
 |
 |
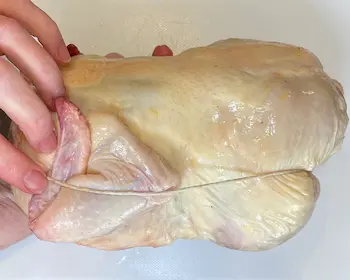 |
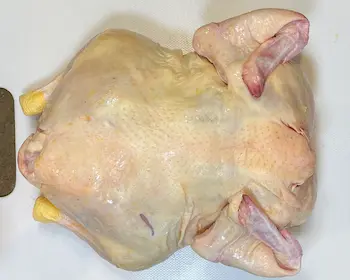
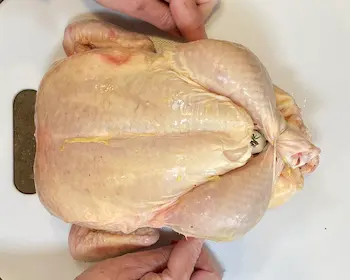
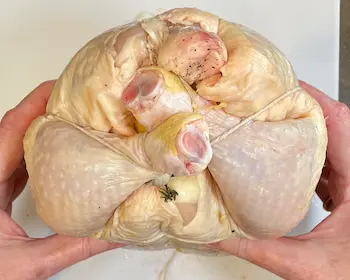
Full disclosure, I usually truss my chicken for roasting, mainly because I like how it looks, and I like to keep the aromatics inside. Here’s how.
- Tuck the wings in behind the bird – this keeps the wing tips from burning.
- Loop the twine around the tail then the legs and pull them tightly together.
- Hold the thighs firmly against the bird and run the twine around the thighs.
- Continue to run the twine around the edges of the breasts and over the wings.
- Tie a knot at the top by the neck.
Best Temperature for Roast Chicken
If you look up roast chicken recipes on the internet you will find many different recommendations for oven temperatures. The USDA recommends for safety that the minimum oven temperature be 325°F (163°C), but I’ve seen recipes recommending as high as 450°F (230°C).
Here is how to think about oven temperature.
Lower temperatures are slower and gentler, giving you more even cooking but less browning. If the oven is less than 325°F (160°C), the concern is that the bird won’t get hot fast enough to kill bacteria.
Hotter oven temperatures will brown your chicken faster giving you deeper colour and crispier skin, but you risk burning the skin and the drippings in the bottom of the pan.
Why I like a moderate oven temperature
I like to roast my chicken at 375°F (190°C) for a few reasons:
- It’s more forgiving, especially if you are a less experienced roaster. You are less likely to burn the skin of the chicken or the vegetables and juices in the bottom of the pan. I like to make gravy from the drippings, so I don’t want to burn them.
- The skin still browns beautifully and will crisp up nicely at 375°F, as do the vegetables.
- Many oils have a smoke point around 400°F. If you’re roasting your chicken at a higher temperature, you need to use an oil with a higher smoke point.
How to Adjust for a Convection Oven
The convection setting on your oven turns on a fan that distributes the heat throughout the oven cavity. This can result in more even, faster cooking. For this reason, a temperature adjustment is often necessary.
A general rule of thumb is to reduce the temperature setting by 25°F (14°C) if you are using convection. Many modern ovens make this adjustment automatically so check your user’s manual.
Roast Chicken Time Chart
The following are approximate cooking times for a 4.5-to-5-pound chicken. Remember, temperature is more important than time. Set your oven timer for the shortest time and if the chicken isn’t done, put it back in for a little longer.
|
Oven Temperature |
Per Pound |
Approximate Roasting Time |
|
350°F (176°C) 375°F (190°C) 400°F (205°C) 425°F (218°C) |
20 – 25 minutes 18 – 20 minutes 15 – 18 minutes 13 – 16 minutes |
1hr 30min – 2 hours 1hr 20min – 1hr 40min 1hr 10min – 1hr 30min 1hr – 1hr 20min |
350°F (176°C) oven: 20 – 25 minutes per pound equals 1hr 30min – 2 hours
375°F (190°C) oven: 18 – 20 minutes per pound equals 1hr 20min – 1hr 40min
400°F (205°C) oven: 15 – 18 minutes per pound equals 1hr 10min – 1hr 30min
425°F (218°C) oven: 13 – 16 minutes per pound equals 1hr – 1hr 20min
How to Tell When Roast Chicken Is Done
You’ve likely heard several tricks to test for doneness in chicken. Things like “if the juices run clear” or “there is no pink in the middle” or “the joints break easily”. At the same time, you were told how dangerous it is to eat undercooked chicken, and if you overcook it, your chicken will be dry. No wonder you were afraid to even try.
It is true that chicken needs to reach a safe internal temperature, but that doesn’t mean it has to be dry. An instant read thermometer will remove any guesswork.
Insert the thermometer into the thickest part of the meat, not touching the bone. Check both the breast and the thigh.
For food safety, chicken should reach 165°F (74°C) before serving. I usually remove mine when it is close, then let it rest for 10-to-15-minutes and confirm the temperature has risen before carving.
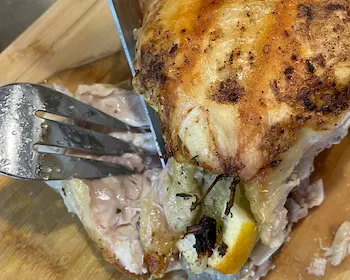
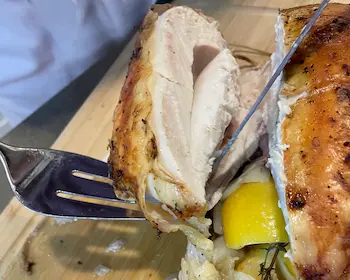
How to Carve a Roast Chicken
 |
 |
 |
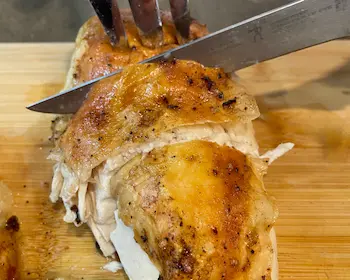 |
Let your chicken rest on the cutting board for 10 to 15 minutes before carving. This is a good time to make gravy.
Pro tip: Use a cutting board with grooved edges to catch the juices.
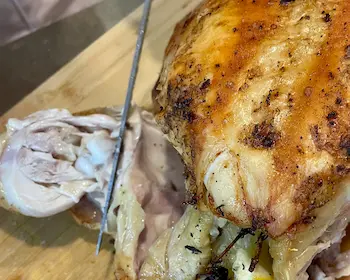
To carve your chicken you can use a chef’s knife or a boning knife. I like my boning knife because it’s easy to maneuver. Now follow these steps:
- Bend the leg back and look for the joint – cut there and remove the leg.
- Bend the thigh down and look for the joint – cut there and remove the thigh.
- Remove the wings
- Remove the breast. You can slice it in half diagonally or into smaller slices.
- Turn the bird over and look for two small pieces of dark meat on the back near the thigh joint. These are called oysters and many people consider them to be the best bite on the bird.
How to Get Crispy Skin
There are two things that cause browning: dry heat and oil. Moisture is the enemy of browning.
So, to get that deep color and crispness, follow these simple guidelines:
- Dry the chicken thoroughly before cooking, inside and out.
- Brush the skin with oil or butter
- Higher heat creates more browning. You need to balance this with thorough cooking and the risk of burning. That’s why I choose a 375°F oven. Feel free to try a higher temperature just shorten the cooking time and keep an eye.
- Don’t put water in the pan and don’t cover the pan. This will create steam and prevent browning.
- Avoid overcrowding the chicken in the pan. You want the heat circulating around the bird.
How to Fix Common Roast Chicken Problems
Skin Isn’t Crispy
Either the temperature wasn’t high enough, or there was some moisture on the chicken. Dry the chicken thoroughly and brush the skin with oil. Then cook in a moderately hot oven with no lid and no liquid in the pan.
Breast Is Dry
Dry meat is almost always about overcooking. Use an instant-read thermometer and remove the chicken from the oven when it's just under 165°F (74°C). After a 10-to-15-minute rest it will reach the recommended temperature.
Thighs Aren’t Done
I’ve read that the thighs take longer than the breast, but honestly, that’s not been my experience. I think this is because I choose a moderate oven temperature. If you’re having this problem, try placing the roast pan so the feet face the back of the oven. Also, stuffing the bird with aromatics to slow the cooking of the breast may help. If the temperature of your chicken thigh reads 165°F (74°C) it’s safely done, even if the meat of the thigh looks pink.
Chicken Is Browning Too Fast
Likely the oven temperature is too high. Turn it down a bit and continue to roast your chicken.
Vegetables Are Burning
The oven may be too hot. Try turning it down a bit. Or you may have cut the veggies too small. 1 ½ to 2-inch pieces work well with a roast chicken.
Juices Look Pink
Pink juices can sometimes occur even when chicken is fully cooked. Check with an instant-read thermometer rather than relying on colour alone.
Chicken Finished Early
If you used the convection setting on your oven, you may need to adjust the temperature lower. Also, the temperature of your oven may not be calibrated correctly. Test it with an oven thermometer.
What to Serve with Roast Chicken
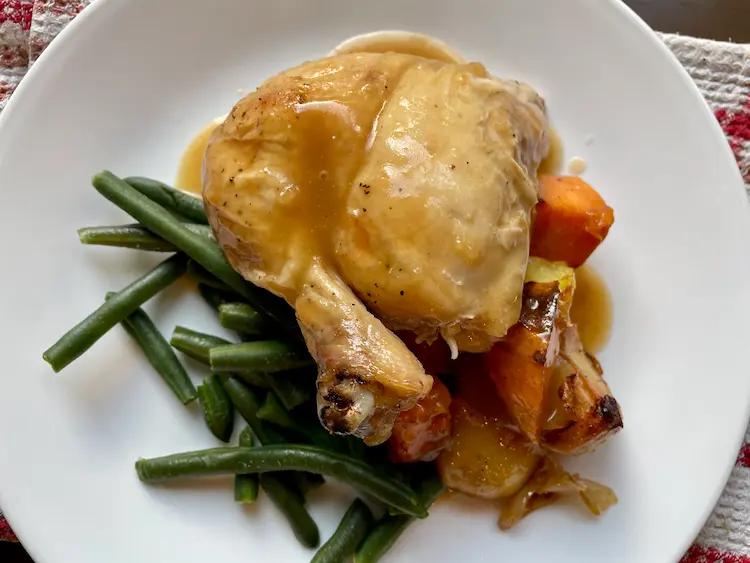
Roast chicken goes with almost anything, but it does have some natural partners. Try these combinations:
- Roasting potatoes, carrots and onion with the bird makes an easy and delicious one pan meal. Serve with a simple pan sauce and a side salad or green vegetable.
- Serve your roast chicken with mashed potatoes and gravy made from the drippings in the pan. Then add a side of steamed broccoli or asparagus.
- Step away from the traditional and serve your roast chicken with rice or a veggie stir-fry.
Leftovers, Broth, and Meal Ideas
I’m a huge fan of leftovers! They help to make your life so much simpler. Cook once, eat for several days. And leftovers can be so much more interesting than sticking a plate in the microwave. Consider these possibilities:
Hot Chicken Sandwiches
I love the open-faced version. Place a slice of your favorite gluten-free bread on a plate. Top with sliced roast chicken and gravy. Serve with a green salad.
Chicken Salad
Try a tossed green salad topped with cubed chicken and a creamy dressing like ranch or Caesar.
Or
Dice up an apple and a stalk of celery then mix it in with your diced roast chicken. Top it off with a creamy homemade dressing made from Greek yogurt, Dijon mustard and a squeeze of lemon juice.
Chicken Soup
Add diced vegetables and a little gluten-free pasta to a good quality chicken broth, then top with shredded roast chicken. Pro tip: cook your gluten-free pasta separately and add it to the soup just before serving.
Or
Almost any gluten-free soup can be enhanced by adding shredded or diced chicken. Try it with bean and bacon soup, pea soup or a hearty vegetable soup.
Other Leftover Roast Chicken Ideas
Of course, you can make a sandwich on a gluten-free bun or wrap with Dijon mustard and mayo – classic and delicious – but try these ideas:
- Chicken tacos – gently warm your roast chicken and add it to a gluten-free taco shell with hot salsa and shredded lettuce.
- Chicken pasta – add diced chicken to your tomato-based pasta sauce or make Fettuccine Alfredo and top with diced chicken.
Reheating Roast Chicken
Your roast chicken will dry out quickly if you’re not careful, especially the breast meat. When reheating in the microwave, be gentle. I like to place it in a bowl with a little water or broth then heat until it’s just warm, not hot.
Broth From the Carcass
The best chicken broths (or stocks) are made from whole, uncooked chicken, or chicken bones that have been lightly roasted then simmered. That said, if you’re like me and hate food waste, you can certainly make broth from your roast chicken carcass. It will be lighter in flavor but still works great for cooking rice or making gluten-free soups that don’t rely entirely on the broth for flavor.
Frequently Asked Questions
What temperature should I roast a chicken?
What temperature should I roast a chicken?
I prefer a moderate 375°F (190°C) oven. It’s hot enough to produce crispy skin yet allows for even cooking without burning.
How long does roast chicken take?
How long does roast chicken take?
A 4.5-to-5 pound chicken will cook in an hour and 20 to an hour and 40 minutes in a 375°F (190°C) oven. Make sure your instant read thermometer reads close to 165°F (74°C) before removing your chicken from the oven. Then let it rest for 10-to-15 minutes before carving and serving.
Should I cover a chicken while roasting?
Should I cover a chicken while roasting?
No. Covering your chicken will trap steam and prevent it from browning.
How do I know when chicken is done?
How do I know when chicken is done?
You can remove your chicken from the oven when your thermometer reads almost 165°F (74°C) then let it rest for 10 minutes. The temperature will continue to rise as it rests.
Do I add water to the pan?
Do I add water to the pan?
No. Adding water to the pan will create steam and prevent your chicken from browning.
Can I roast vegetables with the chicken?
Can I roast vegetables with the chicken?
Yes! This makes an amazing, simple one pan meal. Toss potatoes, carrots and onion with oil and season with salt and pepper. Then arrange them under and around your chicken.
Can I make gravy from the drippings?
Can I make gravy from the drippings?
Yes! Chicken gravy from pan drippings is delicious. Pour the drippings into a measuring cup and skim off fat. Deglaze the pan with wine, broth or water and add to the drippings. Cook 1 tablespoon of gluten-free flour in 1 tablespoon of fat or butter. Whisk in 1 cup of degreased drippings and/or gluten-free chicken broth. For more gravy, adjust the amount of flour, fat and broth accordingly.
Can I roast a chicken from frozen?
Can I roast a chicken from frozen?
Not a good idea. Your chicken won’t cook evenly, and you risk it being undercooked on the inside. Always thaw your chicken before roasting.
Why isn’t my roast chicken skin crispy?
Why isn’t my roast chicken skin crispy?
There was likely some moisture on the skin or in the oven. Dry your chicken thoroughly inside and out. Brush the skin with oil or butter. Do not cover and do not add water to the pan. Roast in a moderate 375°F (190°C) oven.
Sources
1. U.S. Department of Agriculture, Food Safety and Inspection Service. (2020, October 19). How temperatures affect food. https://www.fsis.usda.gov/food-safety/safe-food-handling-and-preparation/food-safety-basics/how-temperatures-affect-food
|
|
Want simple guidance, trusted resources, and doable recipes delivered to your inbox once a week? |
|

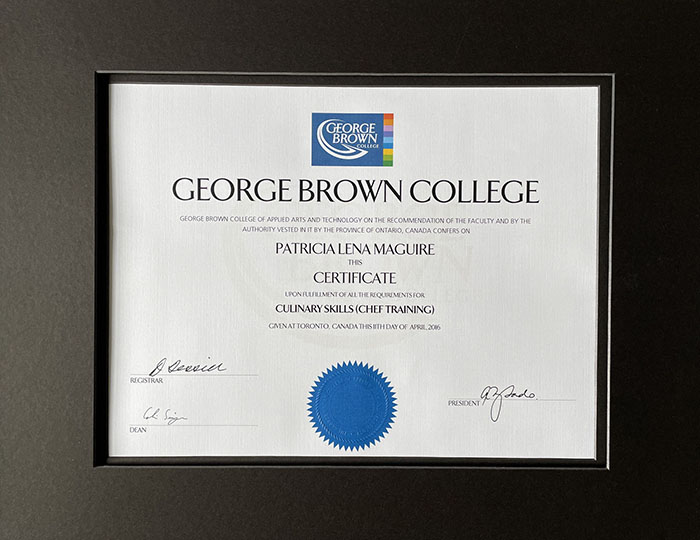
Patty Maguire is a George Brown College culinary graduate whose training focused on nutrition and cooking for special diets.
Since her celiac diagnosis in 2012, she has shared a practical, whole-food approach to naturally gluten-free living that helps readers cook with confidence, eat out safely, travel well, and live fully.
Rooted in farm-family values and simple home cooking, her work has been recognised by Feedspot’s top 10 Canadian gluten-free blogs list.
You might like these
Gluten-Free Salad Dressing: Easy Formula + 5 Simple Recipes
Learn a simple formula for gluten-free salad dressing plus easy recipes you can make in minutes. No bottles needed—just fresh, safe ingredients.
Gluten Free Meal Planning
meal planning and shopping list for a typical gluten free week
Perfect Poached Eggs
Protein is an essential part of a gluten free breakfast and these perfect poached eggs can be the quick easy centerpiece



Hi, I'm Patty.
I'm a person with celiac disease, a culinary school grad, and a lifelong student of food and natural healing.
After my diagnosis in 2012, I enrolled in the Chef’s School at George Brown College and earned my Culinary Skills diploma, focusing on nutrition and cooking for special diets.
Cooking has changed my life — and helped me take back my health. Now, I’m here to help you do the same.
Let’s do this together!

Subscribe!
Get Naturally Gluten-Free Digest
Practical gluten-free tips + a featured recipe/article
delivered to your inbox.
Recent Articles


-
How to Prep Ahead, Store and Reheat Gluten-Free Sheet Pan Dinners
Aug 07, 26 01:48 PM
 Learn how to prep gluten-free sheet pan dinners ahead, store leftovers safely and reheat them without drying out. Includes practical tips and a printable guide.
 -
Sheet Pan Cooking Made Easy: Get Everything to Finish at the Same Time
Jul 22, 26 04:14 PM
 Learn how to stagger sheet pan ingredients so everything finishes together. A simple method using timing windows—not complicated minute-by-minute schedules.
 -
Sheet Pan Cook Time Chart for Proteins and Vegetables
Jul 22, 26 04:13 PM
 Compare sheet pan cook times for proteins and vegetables, timing windows and safe internal temperatures. Includes a printable cook time chart.


Popular Articles


Trained in Culinary Skills with a focus on Nutrition and Healthy Eating!
Visit NGF (NaturallyGluten-Free) on Facebook at: https://www.facebook.com/naturallyglutenfree
On Substack at: Naturally Gluten-Free Digest
Patricia Maguire, copyright © 2026 naturallygluten-free.com Port Hope, Ontario, Canada. All rights reserved
Subscribe to
Naturally Gluten-Free Digest
- Feel safer and more confident eating gluten-free
- Save time and money with practical strategies
- Discover trustworthy recipes and resources without wading through misinformation
It's Free!
You won't have to remember to check back.
NGF will land in your inbox weekly.
and
As a thank-you from me you get a free
Printable Gluten-Free Food List
that you can pin to your fridge or take shopping.
I respect your privacy!
I won't use your email for anything but to send you the newsletter.