7 Easy Steps to Baking Soft Delicious Gluten Free Bread
Are you tired of tiny little bricks of bread that taste like cardboard and cost a fortune?
Do you wish you could still have soft, delicious bread?
Great News! Baking gluten free bread is easier than wheat bread.
Pin for Later

Why Bake Your Own Gluten-Free Bread?
- Baking gluten-free bread is far less expensive than buying it, and it’s not hard at all.
- Baking gluten-free bread is much easier than wheat bread because there are fewer steps. No kneading and only one raising cycle.
- Baking gluten-free bread is healthier than buying it because you control the ingredients. There is less sugar and no chemical preservatives.
- Baking gluten free bread is satisfying. Can you smell it already? That sweet intoxicating aroma of fresh baked bread? And it’s coming from your kitchen!
What You Need For Baking Gluten Free Bread
Gluten-Free Bread Flour
When baking gluten-free bread, it helps to know a bit of the science behind gluten-free baking like what makes bread rise and hold it's shape.
Gluten is what gives the product structure so that it holds its shape when it rises. The gluten forms little pockets that fill up with air like balloons, and then hold their shape when baked. That’s why you have those high fluffy white loaves.
You may have noticed that rye bread forms a shorter denser loaf. That’s because rye contains less gluten than wheat.
Gluten free grains have no gluten to build structure so the flour needs another ingredient to do this job. Most recipes use gums like guar gum or xanthan gum. Some use psyllium husk or ground flax seed which are less processed. These all work pretty well so it's a personal choice.
You can buy gluten-free flour or mix your own blend. The page in the link gives some good guidance for both.
Is Gluten-Free Bread Healthy?
Here is a deep dive on gluten-free bread nutrition facts. You'll find out what to look for and what to avoid along with a nutritional comparison of gluten-free bread vs wheat bread.

Equipment for Baking Gluten-Free Bread
To bake gluten-free bread you need:
- Kitchen scale (and a lightweight bowl or container if your scale is not the type that has one built in)
- Mixer (stand mixer with a paddle attachment, or a hand mixer and mixing bowl)
- Measuring cups and spoons
- Digital thermometer
- Spatula
- Scoop (optional)
 |
Want simple guidance, trusted resources, and doable recipes delivered to your inbox once a week? |
|
|
|
Want simple guidance, trusted resources, and doable recipes delivered to your inbox once a week? |
|

Patty Maguire is a George Brown College culinary graduate whose training focused on nutrition and cooking for special diets.
Since her celiac diagnosis in 2012, she has shared a practical, whole-food approach to naturally gluten-free living that helps readers cook with confidence, eat out safely, travel well, and live fully.
Rooted in farm-family values and simple home cooking, her work has been recognised by Feedspot’s top 10 Canadian gluten-free blogs list.
You might like these
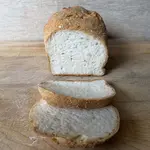
Gluten-Free Bread
Gluten-Free Bread. Can bread be naturally-gluten free? Is it better to buy or bake your own? Why does gluten free bread cost so much?
Gluten Free White Bread and Buns
A basic gluten free white bread recipe, great for sandwiches and dinner rolls
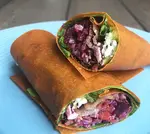
Gluten Free Wraps
Gluten Free Wraps are so easy and versatile you may give up your search for gluten free bread that leaves you feeling crumbled.

Seven Simple Steps for Baking Gluten-Free Bread
1. Assembling your ingredients
- As always, use fresh, high quality ingredients.
- Flours and yeast will keep for a long time in the refrigerator.
- Weigh and assemble all your ingredients in advance.
- Everything should be at room temperature for the product to rise properly. So take it all out of the fridge in advance; about 30 – 60 min for eggs and butter.
The flour will come to room temperature quickly.
If you forget to take your eggs out of the fridge in advance, you can warm them up by placing them in warm water for 5 – 10 min. By the time you’ve assembled your dry ingredients they should be fine.
Yeast needs warmth to rise and is often mixed with warm water and allowed to sit for a few min. The water should be at 40 degrees Celsius (104F). Warm water from the tap is fine and use a digital thermometer to measure the temperature.
2. Mixing Your Gluten Free Bread Dough
Use the paddle attachment on your stand mixer. You won’t need the dough hook for gluten free bread.
Gluten free products benefit from a lot of
mixing. It combines the ingredients well
and aerates the batter.
Invest in a stand mixer if you’re going to be doing much gluten free baking. It saves your arm and frees you up to do other things while your product mixes, often up to five minutes.

Consistency of Gluten Free Bread Dough
Gluten free bread dough is very sticky, more like a batter.
It may have a tendency to crawl up the side of the bowl while mixing. That’s okay, just shut the mixer off, push the dough down with a spatula and then turn it back on. You may need to do this more than once.
Depending on the recipe, you may need to handle the dough. A little water or oil on your hands will help to keep it from sticking to you.
Kneading Gluten Free Bread Dough
Most recipes don't involve kneading. This is one reason why baking gluten free bread is so much easier than wheat bread. Gluten free bread needs all the help it can get to stay light and airy. Kneading can release some of the air. If you do knead, use a light touch and them form your dough into a loaf.
3. Putting Your Gluten Free Bread in the Pans
Most gluten free bread recipes will have you take the dough directly from the bowl to the pan. An ice cream scoop works well for this. It helps to keep some air in the dough and also to measure how much dough goes in the pan. One scoop for buns, three to five for a loaf depending on the size of the pan.
I like doing rolls or buns in muffin tins because it helps them keep their structure and raise up taller. You can also scoop them out onto parchment. You’ll get a thinner, flatter bun that works well for hamburgers. Be careful not to overcook. For loaves, smaller pans work best.
 |
 |
4. Rising or Proofing
Here’s the trick that will make all the difference in how happy you are with the finished product.
Yeast rises best in a warm moist environment at 35C (95F) and 85% humidity.
Professional bakeries use a proofer. You can create this affect in your kitchen.
If you have a second oven, put it on warm then turn it off. Boil the kettle and put a container of boiling water (I use a pie pan or a small loaf pan) in with your bread as it’s rising.
Use Your Microwave as a Proofer
Or
you can create the same affect in your microwave. Use a microwave safe
container and boil the water in the microwave.
This will heat the oven and create the moisture you need.
Once your product has doubled in size it’s done! Put it in the oven.
That's right, only one rising cycle.
Use the timing on the recipe as a guide only. It might be tempting to leave your dough to rise a little longer and a little higher, but this could backfire. If you leave it too long it will continue to rise then collapse like a wad of bubble gum that gets too much air then bursts. You may even see the little broken bubbles on the top. This is also how you get bread with big holes in it.
 Gluten-free rolls proofing in humid microwave.
5. Baking Your Gluten Free Bread

Bread also bakes best in a moist oven.
While you’re preheating your oven, put an old pan that you don’t care about or a disposable pan in there to heat up too. As soon as you put the bread in, throw in a handful of ice cubes. They will create steam right away. Close the door and let the bread bake.
When baking gluten-free bread, use the timing in the recipe as a guide only.
To be sure if the bread is done, insert a tester into the center. If it comes out clean the bread is baked. If some of the bread sticks to the tester, it may still be done. Feel it to see if it’s nice and moist and fluffy, or if it’s still wet and sticky.
If you want to take the guesswork out, use your thermometer. Bread when it’s baked is between 190 and 200 degrees Fahrenheit (88 - 93 Celsius).
6. Cooling Your Gluten Free Bread
Your gluten free bread will hold its shape best if you let it cool in the pan in the oven for a bit. Just turn the oven off and open the door a crack.
Then move it to a cooling rack and let it cool completely before slicing.
7. Storing Gluten Free Bread

Gluten free baked goods spoil and dry out quickly.
If you’re going to eat your bread within a few days you can store it in a plastic bag or air tight container in the cupboard. Any longer than that, I recommend putting it in the freezer. Take it out as you need it and pop it right into the toaster. If you want your bread untoasted just take it out a little earlier.
To keep the slices from sticking together when frozen, you can put a piece of wax paper between each one. I just make sure the bag is not too tight, then after it’s been in the freezer about an hour I take it and move the slices around a bit to unstick them.
Gluten Free Bread Recipes
Gluten-Free Bread Mixes

There are many mixes available in grocery and specialty stores. These make baking gluten-free bread even easier. I encourage you to try a few and see if there is one you like.
The one I keep on hand is Duinkerken brand. It's available at Bulk Barn and is Canadian made in Prince Edward Island, Canada. Instructions are simple and the results are good.
Another popular brand is Bob's Red Mill.
Gluten Free Bread Substitutions
Of course there are alternatives. We all like a little variety in our lives. Why not try a gluten free wrap, or corn bread, or quick breads.
Home > Gluten Free Bread >Baking Gluten Free Bread

Hi, I'm Patty.
I'm a person with celiac disease, a culinary school grad, and a lifelong student of food and natural healing.
After my diagnosis in 2012, I enrolled in the Chef’s School at George Brown College and earned my Culinary Skills diploma, focusing on nutrition and cooking for special diets.
Cooking has changed my life — and helped me take back my health. Now, I’m here to help you do the same.
Let’s do this together!

Subscribe!
Get Naturally Gluten-Free Digest
Practical gluten-free tips + a featured recipe/article
delivered to your inbox.
Recent Articles
-
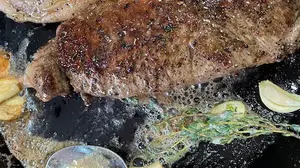
How to Pan Fry a Steak (Pan-Seared Method for a Perfect Crust)
May 02, 26 09:07 PM
 How to pan fry a steak perfectly on the stove. Get a golden crust and juicy center with this simple step-by-step method, timing guide, and expert tips.
 -
Gluten-Free Meat Cooking: Choose the Right Cut & Cook It to Perfection
Apr 27, 26 05:48 PM
 Cook gluten-free meat with confidence. Learn simple techniques, avoid gluten in sauces and marinades, and make tender, flavorful meals every time.
 -
Gluten-Free Salad Dressing: Easy Formula + 5 Simple Recipes
Apr 20, 26 02:59 PM
 Learn a simple formula for gluten-free salad dressing plus easy recipes you can make in minutes. No bottles needed—just fresh, safe ingredients.
Popular Articles


Trained in Culinary Skills with a focus on Nutrition and Healthy Eating!

Visit NGF (NaturallyGluten-Free) on Facebook at: https://www.facebook.com/naturallyglutenfree
On Substack at: Naturally Gluten-Free Digest
Patricia Maguire, copyright © 2026 naturallygluten-free.com Port Hope, Ontario, Canada. All rights reserved
Subscribe to
Naturally Gluten-Free Digest
- Feel safer and more confident eating gluten-free
- Save time and money with practical strategies
- Discover trustworthy recipes and resources without wading through misinformation
It's Free!
You won't have to remember to check back.
NGF will land in your inbox weekly.
and
As a thank-you from me you get a free
Printable Gluten-Free Food List
that you can pin to your fridge or take shopping.
I respect your privacy!
I won't use your email for anything but to send you the newsletter.